Need to work out at home but don’t want to buy weights? Here’s how to make a sandbag for your all-in-one home fitness gym. And for about $30 or less.
This post may contain affiliate links. Please see my full disclosure here.
I looooove my sandbag. The first one I made in 2011 when I started getting into home workouts with then-Bodyrock’s amazing Zuzka Light. I started with bodyweight-only workouts (which are amazing, by the way), but then wanted to do more. Zuzka used a commercially bought and constructed sandbag (something like this), which is great but also something like $80 or more—and that’s without any weight in it.
I wanted to find a cheaper way, and through forums and Google searches, I did. Fast forward to 2016 and I had to get rid of it when we moved from California to New York. We had adjustable kettlebells, and then I joined a gym, and then…2020 happened. COVID and home quarantine happened. The gym went away, and home workouts were back in my life–-and probably yours. So I made another one.
What IS a sandbag?
You might be wondering the heck a sandbag even is, anyway. For workout purposes, it’s what it sounds like: a bag filled with sand–-or rocks or gravel, something that shifts around in its container. And the bag usually has handles or a way to grab it in some way, so you can lift, clean or even swing it in different ways. They are sometimes called stability bags, rep fitness bags or core bags. There are also Bulgarian bags, which are shaped a bit differently, but it’s the same basic concept.
This is what a sandbag generally looks like, if you use it at the gym or look it up online:

Why have a sandbag?
I wrote a whole post on why they’re so awesome, but to sum it up, sandbags are a great all-in-one gym for your fitness needs. You can use them for isolation exercises, but they really excel with compound exercises, working multiple muscle groups and joints at once, which also burns a ton of calories. Because the weight shifts somewhat in the bag, it also provides a great workout for your core.
And, in my opinion, working out with them is fun. There are a ton of fun ways to lift and use the sandbag, and you can get really creative with your sandbag workouts.
Homemade sandbag upsides and downsides.
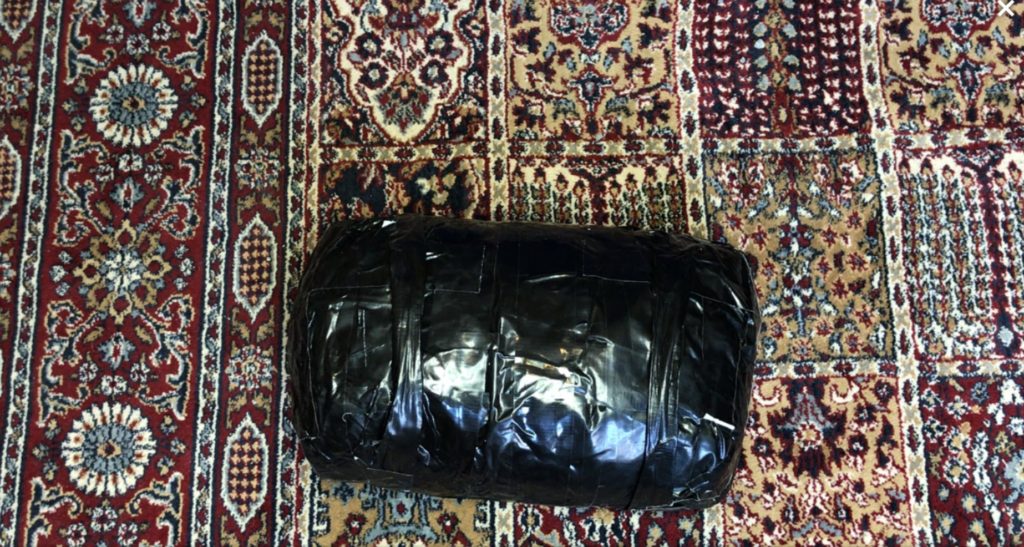
My homemade sandbag ain’t pretty, but she’s mine. And there’s something really great about making your own workout equipment. I’m also a DIY-er, so this stuff always makes me happy.
Oh yeah–-and it saved me probably about $70. Yup. I’ll get to that later.
There are a few downsides, though. For one, a homemade sandbag won’t be as durable as a commercial one. It’s made of plastic and duct tape. Granted, my first sandbag never needed serious repairs, and when it needed a little reinforcement, I just slapped more duct tape on it. And it lasted for five whole years until I had to throw it away.
Another downside is that you don’t get as much of that weight-shifting inside the bag as you would with a commercial bag. Because you’re literally wrapping it in duct tape, it’s a pretty solid shape with some give in it, and over time, it gives a bit more. How important is this? Honestly, not much. Most of the benefit of the sandbag is its weight, and being a softer, more malleable weight than something like a dumbbell is. Even with a commercial bag, you don’t want too much space in there.
Last downside is the handles. I have two handles on mine, but they face perpendicular to the length of the sandbag. I’d love to craft a couple handles that are facing the other way to make it easier for overhead presses and things, but the the physics of a tape-made sandbag make it difficult. However, I have some ideas. I may update this post if I am successful. In the meantime, the handles aren’t the most comfortable.
Cost of making your own sandbag.
The cost of your sandbag depends mostly on things: access to materials at home and access to materials in the world. You might have some or all of the materials at home already. If so, fantastic!
If not, you will have to buy them. When I set out to make my sandbag, the pandemic had just hit and no stores were open, so I had to have everything delivered, which was really difficult for a 50lbs bag of gravel. (After I made that order, I think the vendor changed their delivery policy on that item.)
Here’s exactly what it cost me:
| Quikrete All-Purpose Gravel 50 lb. | $6.59 |
| Shipping & Tax ($13.64 shipping and tax $.58) | $14.22 |
| 3M Duct Tape Black, 1.88 inches by 60 yards (shipped free) | $10.49 |
| Heavy duty plastic bags (already had) | $0 |
| Reusable shopping bag (already had) | $0 |
| Total Cost: | $30.31 |
Cost of commercially made sandbags.
To compare, here’s what some commercial sandbags cost. Keep in mind that none of these include the cost of actual sand/rocks/gravel/weight:
Ethos 60lbs Sandbag: $99.99
SKLZ Super Sandbag: $59.99
GoFit Sand Bag set: $49.99
GarageFit 25-75lbs Sandbag: $89.95
Honestly, the price has gone down in the last ten years, as sandbags have become more mainstream. And I even found some online for as low as $30 (Here’s one from Walmart). However, you’re still spending money on an empty bag.
What you need to make your sandbag.
It might cost you less than it cost me, depending on what you have and what’s available where you are. But with the trusty internet, you should be able to make one, weighted, for under $50, even if you have to buy every single item.
What you need:

- Gravel or rocks. Get at least 25% more than you need for the sandbag, just in case. For my 40lbs sandbag, I bought a 50lbs bag. You might already have rocks or gravel near you for free. If so, be sure to cleanse and dry them thoroughly. If you need to buy them but don’t need the rocks delivered, you might save a lot on shipping costs. I looked everywhere to find a place that would deliver the gravel at all, let alone cheaply. But luckily for us, the pandemic doesn’t have us in complete shutdown anymore. Depending on the type of gravel available, it might cost you more than the $7 I paid. Gravel (sometimes called “pea pebbles” or “pea gravel”) is used for all kinds of aesthetic purposes, so the price runs the gamut. Get the cheapest kind you can. I don’t recommend using sand. It’s too fine and will end up all over your house.
- Duct tape. Don’t skimp on the tape. Ideally, get a brand name one, the stronger, the better. And get a lot. I used maybe half of my 60-yard roll, but it comes in handy for other projects or sandbag repair. I picked black because it’s more attractive than the standard gray/silver, but it comes in all colors, now.
- Heavy-duty bag for the inside, or two. For my first sandbag, I bought a bag of contractor bags for about $10 and used one. Contractor bags are great, but then I was stuck with a bunch of bags I didn’t need. If you already have contractor bags, use one of those. They’re fantastic and can hold a lot without breaking. Do NOT use heavy-duty trash bags—trust me, they’re not strong enough. For this sandbag, I ended up going into my reusable grocery bag stash and found one that was plastic and very strong but it wasn’t big enough. I ended up using the gravel bag itself, then wrapped that in a couple more bags for durability.
- Reusable grocery bag with long handles for the outside. I used the kind that is kind of fabric-like but made out of recycled materials. The thick, almost woven ones might be a bit too stiff. You’re looking for an outside container, and something with long handles because they will wrap around the bag and form the sandbag’s handles. As you’ll see from my video, my handles still weren’t long enough, so I cut them, but still used them for the handles.
That’s it!
How to make your sandbag.
Instructions are below, and here’s a sped-up video of how I made mine.
- Weight out the gravel (or rocks). Place them in your heavy-duty bag. Or, remove the rocks you don’t need from the gravel bag, tape the bag up, and then place it in the heavy duty bag.
- Shape the bag into a log-like shape, and secure that shape with a couple of pieces of duct tape.
- If you need more coverage, wrap it again in another bag, and tape it up.
- Put the sandbag log into your outer bag. Fold the outer bag around the inner, and if you can, place the handles so they each wrap around the whole sandbag, with some give. If they aren’t long enough, cut one end of the handle, and you’ll shape the handles as you tape the bag.
- Tape it up! Start with the center of the body, taping around the circumference of the sandbag the short way first. This will help it hold its shape when you go on to do the handles.
- Tape the handles. Take a piece of tape in line with the handle and then wrap it around so it has enough space away from the body of the sandbag. When it’s time for the handle to reattach, place the tape (with handle inside of it) back on to the body of the bag and continue taping around. You might find it easier to do the handles in single pieces of tape that match the circumference of the sandbag with the handle. You want the handles to be the same distance from the ends of the sandbag, and a decent distance from each other. My sandbag is about 16 inches long, with about eight inches between handles.
- Continue taping around the sandbag until it’s all covered in duct tape, taking extra care to reinforce the handles a few times. Also be sure to run tape around the sandbag the long way, especially around where the handles attach.
You’re done! Now you have your own, one-of-a-kind sandbag. Enjoy!